Tile Guide

How to lay ceramic wall tile in your home
Ceramic tile is a versatile and durable finishing material. Tiles can be installed as a floor or wall covering nearly anywhere, but they are especially useful in bathrooms and kitchens. Tiled walls can resist moisture and handle scrubbing much more readily than drywall or other materials, and so they are the ideal choice for humid bathrooms and kitchens where they will be exposed to cooking splatters. Learning how to install ceramic wall tile is a task well within the reach of an average homeowner. The process requires only a few tools and materials.
Prepare the wall for the ceramic tile
- Begin preparing the wall by removing any outlet covers and switch plates. Roughen the surface of the wall by sanding it with coarse-grit sandpaper; this will help to improve adhesion when you install the tile. Use a damp rag to clear away the dust left from sanding.
Apply tile mastic or mortar to the wall
- Ceramic tiles can be adhered to a wall using either of 2 products: tile mastic or thinset mortar. The application process is the same for both products. Use a V-notched trowel (sometimes sold as a "tiling trowel") to spread some of the mortar onto the wall, covering an area just big enough to lay in about 8 tiles. Hold the notched trowel at a shallow angle against the wall, so that the notches on one of its long sides dig grooves into the mortar. Use long, sweeping motions to apply the mortar.
- It is best to start applying the mortar along an edge of your wall (such as the area where a tile backsplash meets the countertop). Installing your first few tiles along this straight edge will ensure that your overall tile pattern is not crooked.
Install the ceramic tiles
- To install your first tile, align one of its edges with the edge of the wall. Making sure that it is straight, push it firmly into the thinset mortar to seat it. Installing each successive tile is easier if you use tile spacers - small X-shaped plastic pieces that fit between corners of tiles and ensure an even spacing of all joints. Keep installing tiles by lining them up and pressing them firmly into the mortar. Once you have reached the edges of the area where you applied the mortar, repeat the process by applying another equal-sized area of mortar and applying about 8 more tiles. This process keeps the mortar from curing too quickly.
- Install each tile in this manner until you reach the other edges of the wall. Most likely, you will need to cut the final tiles smaller to get them to fit against the other edges.
Cut any tiles that need to be trimmed to fit your pattern
- The final row of tiles in either direction will likely need to be cut to size. Begin by holding the full tile up to the area where it needs to be installed, and marking a pencil line where it will need to be cut. The most economical way to cut straight lines in tiles is using a snap tile cutter. Run the scoring wheel firmly over the pencil line on the tile and then snap it cleanly along the score mark. The cut tiles can then be installed as usual. Many home improvement stores run tool rental programs through which you can rent a snap tile cutter by the day. For bigger jobs, consider using a wet tile saw. If you anticipate multiple tiling projects, you may want to purchase a tile saw of your own.
- If you need to make cuts in any shape other than a straight line, you will need to use a wet tile saw that can notch cuts partially through a tile. This is helpful for making rectangular cutouts to fit tile around an electrical outlet.
Grout the joints between the tiles
- After allowing the mortar to cure for about 24 hours, you are ready to fill in the joints with grout. Use unsanded grout for joints narrower than 1/8 inch (3 mm), and sanded grout for joints wider than this. Mix the grout in a clean plastic bucket according to the package direction.
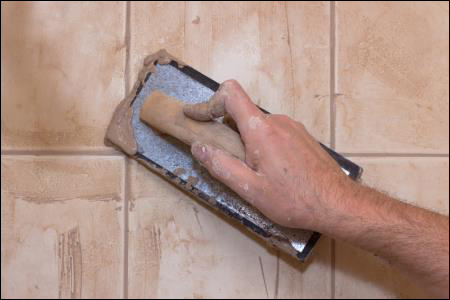
- Use a rubber grout float to scoop a small amount of grout out of the bucket. Run the float across the surface of the tile, pressing firmly to work it fully into each joint. Running the float diagonally with respect to the joints provides the best results.
Clean the ceramic tiles after grouting
- When each joint has been filled with grout, you can clean the excess grout from the surface of the tiles. Do this by rubbing the tiles gently with a sponge and water, rinsing often. Working diagonally to the joints will keep you from lifting any grout out from between the tiles. After about half an hour, the grout will be cured and a hazy film will develop over the tiles. Buff this film away using a clean, dry cloth.
Tips
- In wet environments, it is best to apply a bead of silicone caulking around the borders of the tile installation.
- If you notice a skin forming on top of the thinset mortar or tile mastic, do not install tiles over it. Scrape it off using a paint scraper and apply fresh mortar before continuing.
- Ceramic tiles can be applied to nearly any surface, including both painted and unfinished drywall. However, for the best adhesion, consider installing cement backer board underneath the tiles.
Things You'll Need
- Flat head screwdriver
- Coarse-grit sandpaper
- Cloth
- Water
- Tile mastic or thinset mortar
- V-notched trowel
- Ceramic tiles
- Tile spacers
- Snap tile cutter
- Tile grout
- Rubber grout trowel
- Sponge