Tile Guide

How to lay ceramic floor tile in your home
Laying a ceramic tile floor can be considered a daunting task, but with adequate planning and preparation, this perception can be overcome. Knowing how to Lay tile in your home will have far reaching rewards by monitoring professionally the process. Cost can be minimized by careful planning and preparation.
Planning and Preparation
Evaluate the space to be tiled
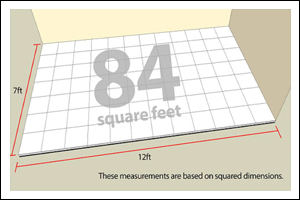
- A first phase of evaluation is to determine the size of the room to be tiled (or re-tiled).
- The number of tiles you will need will depend on the size of the tile you wish to lay, as well as the tile pattern you will like on the floor.
- Using a tape measure or digital laser tape, measure the room from one wall to the opposite wall, and note the distance. Let's say the measure of this distance is 12 feet.
- Measure the distance of the opposing walls to each other. Let's say this distance is 7 feet. Multiplying these 2 distances (12 feet x 7 feet) will yield a total area of 84 square feet.
Note: These measurements are based on squared dimensions. If the room is not perfectly "squared" (or in this case "rectangle") because of an irregular floor plan (where there might be a small section off of one side, for example), do not factor this space into your measurement. While you will of course need to tile this space, factoring this space into your measurements will affect finding the "center" of the room, which will be discussed shortly.
This area is important to note, since it will provide you with an estimate of the number of tiles you will need to purchase to cover the area to be tiled.
Decide on your tile size and pattern
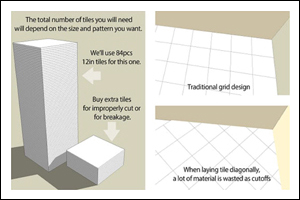
- Tile comes in different sizes: 4inch by 4 inch, 8 inch by 8 inch, 12 inch by 12 inch, for example (there are others, too). Tiles can also be laid in different patterns.
- The total number of tiles you will need will depend on the size and pattern you want. For simplicity's sake, let's assume we are going to use 12 inch by 12 inch tiles and use a traditional grid design, where tiles are simply laid in pattern like graph paper.
- Because the area of the room is 84 square feet, we will need about 84 12 inch x 12 inch (1 square foot) tiles (even accounting for the spaces in between tiles, known as "joints"). However, it is a good rule of thumb for beginners to purchase extra tiles to account for improperly cut or scored tiles, or for breakage. Buy an extra pack or two of tiles to be safe.
- When laying tile diagonally, a lot of material is wasted as cutoffs. A good rule of thumb here, even for experts, is to buy 15% more tile than the square footage would dictate.
Pick a color
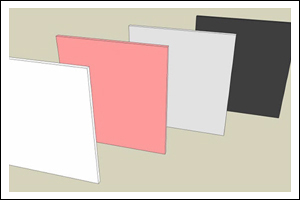
- You are only limited by your imagination (and the store's stock).
- Choice of color typically is a matter of individual choice. The only additional step of planning and preparation with regard to color of the tile is with the grout selection. Grout is the "filler" that goes in the spaces between tiles, the joints.
- It can be grey, white, terra cotta, and so on. Typically, dark tiles with light grout really show the spaces in between tiles, and vice versa.
- The selection of grout color will really depend on how you would like the floor to look to the eye. There is no hard and fast rule.
Prepared your space
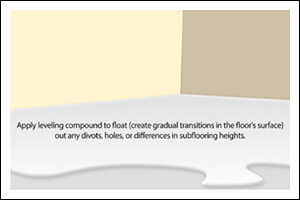
- Be sure that the entire surface is as smooth as possible.
- You will likely need to use floor leveling compound (available at any building material store) to float (create gradual transitions in the floor's surface) out any divots, holes, or differences in subflooring heights.
- If you don't "float" out these differences your tile will crack. Your surface is now prepared for tiling.
Setting Up
Find your center point
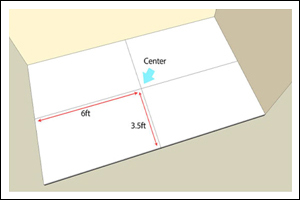
- You have already determined the size of your room, which is 84 square feet.
- Finding the center point is critical for laying the tile. It will determine where you will lay your first tile and the next ones.
- Measure one wall, for example the 12 foot wall. At 6 feet, half the distance, mark a point with a pencil.
- Do the same on the other 12 foot wall. Using your chalk line, anchor one end at the midpoint of one wall and stretch across to the midpoint of the other. "Snap" the chalk line by lifting it up slightly and letting it hit the ground; this will leave a straight line on the floor.
- Measure the 7 foot walls and mark a point a 3 ½ feet on both sides.
Rehearse laying out tiles
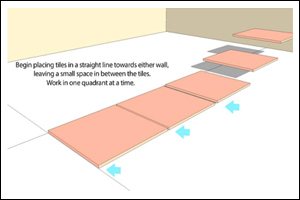
- When you have found your center point, you will notice you will have a "quadrant" design on the floor, or 4 equally sized areas.
- Starting at the center, "rehearse" your tile pattern by simply laying them on the floor without any adhesive or glue.
- Place the first tile at the corner nearest the center point. You are only going to work in one quadrant at a time.
- Begin placing tiles in a straight line towards either wall, leaving a small space in between the tiles.
- While placing the tiles on the bed surface any tiles with shade variations can be replaced.
Repeat the same process for the 3 ½ foot line
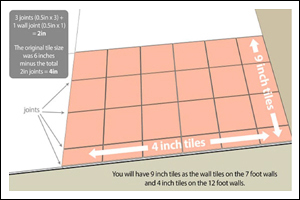
- You will use 3 full tiles and 1 tile cut to 4 inches, since the size of the 3 joints plus the 1 wall joint equals 2 inches and your original tile size was 6 inches (6 inches original tile- 2 inches total joint= 4 inch tile).
- Note that this does not follow the realignment strategy mentioned above. Because this room is "squared," the true center is best left where it actually is. Simply make uniform cuts as they correspond to each side (in this case, you will have 9 inch tiles as the wall tiles on the "short" 7 foot walls and 4 inch tiles on the long 12 foot walls.
Follow the same process for the other three quadrants
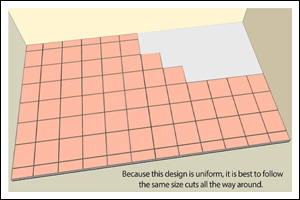
- Because this design is uniform, it is best to follow the same size cuts all the way around.
Pre-drill some tiles to fit over items such as radiator pipes, bath pipes, and so on
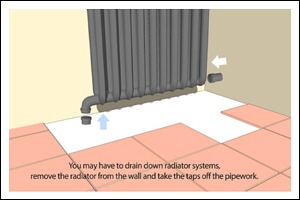
- To achieve this you may have to drain down radiator systems, remove the rad from the wall and take the taps off the pipework. Very time consuming but worth the effort if a minimal look is desired. Your floor will look better if you can drill a hole in the tile and lay the tile over the pipe.
Use a diamond hole saw to bore into the tile and drill a perfect hole
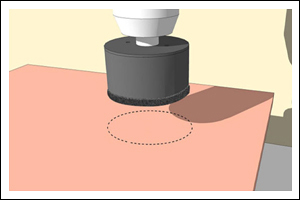
- If you do not have a hole saw you can use a wet-tile saw to cut a square hole in the center of the tile. Draw a square on the back of the tile in the desired location of the hole. Carefully place the backside of the tile against the wet-saw blade at the midpoint of one of the sides of the square.
- Gently push the tile against the blade until the edge of the square is cut. Repeat for the other sides of the square hole.
When your floor is rehearsed and all tiles are laid, measured, and cut, and appear to your liking, you are ready to lay the adhesive
Spreading Adhesive or Mastic and Laying Tiles
Pick up all tiles and set aside
- On your prepared surface, begin spreading the adhesive with the notched trowel. You will start from the center point, work only in one quadrant, and apply small sections at a time, following the pattern during the rehearsal.
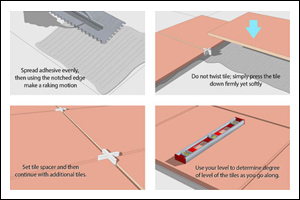
- Spread adhesive evenly, then using the notched edge, make a raking motion. You should have grooves neither too deep nor too shallow.
- Set the first tile in place at the corner lines made by the center point. Do not twist tile; simply press the tile down firmly yet softly.
- Set tile spacer and then continue with additional tiles. (Remember to set tile spacers after each tile).
- Use your level to determine degree of level of the tiles as you go along. (Not all surfaces are perfectly level!).
- If slightly uneven, either manipulate the tile or add a little more adhesive to the floor until level. Usually, after a quadrant is complete, remove the tile spacers so they do not set into the adhesive.
- Follow this process for the remainder of the floor, making sure to check the level as you go along.
Wait at least one day
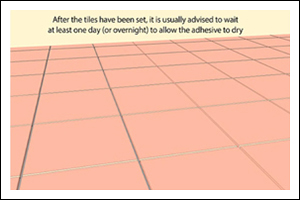
- After the tiles have been set, it is usually advised to wait at least one day (or overnight) to allow the adhesive to dry, or cure. After the adhesive has cured, you will grout the joints.
Grounting
Continue working in quadrants as before
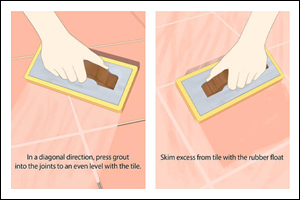
- Using a rubber float, apply only enough grout as you can effectively work with.
- In a diagonal direction, press grout into the joints to an even level with the tile.
- Skim excess from tile with the rubber float. You will notice a mild "grout haze on your tiles.
- Wait a few minutes for the grout to stiffen up in the joints.
- Use a damp sponge work across the joints, (working along joints can drag out too much grout) to remove grout haze from tiles and finish the joints, make sure not to press too hard on joints.
- As you work, check each joint is full and smoothly finished.
- Continue this process with other joints in remaining quadrants.
Consider caulk
- For joints at the wall and floor interface it is best to use caulk instead of grout. There are benefits to using caulk along wall joints. All tiles may expand or contract depending on temperature fluctuations. The wall joints are also known as expansion joints. Using caulk here will buffer expansion and contraction a bit.
Let the floor cure
- Wait for the entire floor to cure for about a week before giving it a good mopping to remove remaining grout haze.
- You may also choose to seal the grout with a sealer to lock out dirt and or grease.
Tips
You can determine the accuracy of the right angle (90 Degrees) center point by following a simple measurement (based on the Pythagorean theorem, which will impress your friends when you bring it up in conversation). From the center point, measure out in one direction exactly 3 feet and mark a point. From the adjacent line, measure out in the other direction exactly 4 feet and mark a point. Then, taking a measuring tape, measure the distance between those two points. It should be exactly 5 feet from the points, where the tape measure resembles the hypotenuse of a right triangle. Remember, Pythagoras' theorem states that side A squared (3 feet x 3 feet= 9) plus side B squared (4 feet x 4 feet= 16) equals side c squared, 25 feet. The square root of 25 is 5 feet, or the distance you should see between the two points. If the hypotenuse does not equal 5 feet exactly, re-measure the walls and re-snap the chalk lines. The room is likely not square. Splitting the difference will make this fact less obvious once the tiles are in place.
Things You'll Need
- Tile (as determined above)
- Tile adhesive or "mastic"
- A notched trowel
- A tile saw or a tile scorer
- A diamond hole saw to cut out radiator pipes and other holes
- Grout
- rubber float(a putty knife will scratch the tile face)
- Tape measure (or digital laser tape)
- Bucket (with warm water)
- Sponge
- Level
- Chalk line
- Pencil
- Tile spacers
- Nominal tile sizes, a 6" tile is probably 5 7/8" x 5 7/8"